
BTC_ETH_Intra_Day_Analysis
@t_BTC_ETH_Intra_Day_Analysis

What symbols does the trader recommend buying?
Purchase History
پیام های تریدر
Filter
BTCUSDT Trade Plan (December 08, 2025)
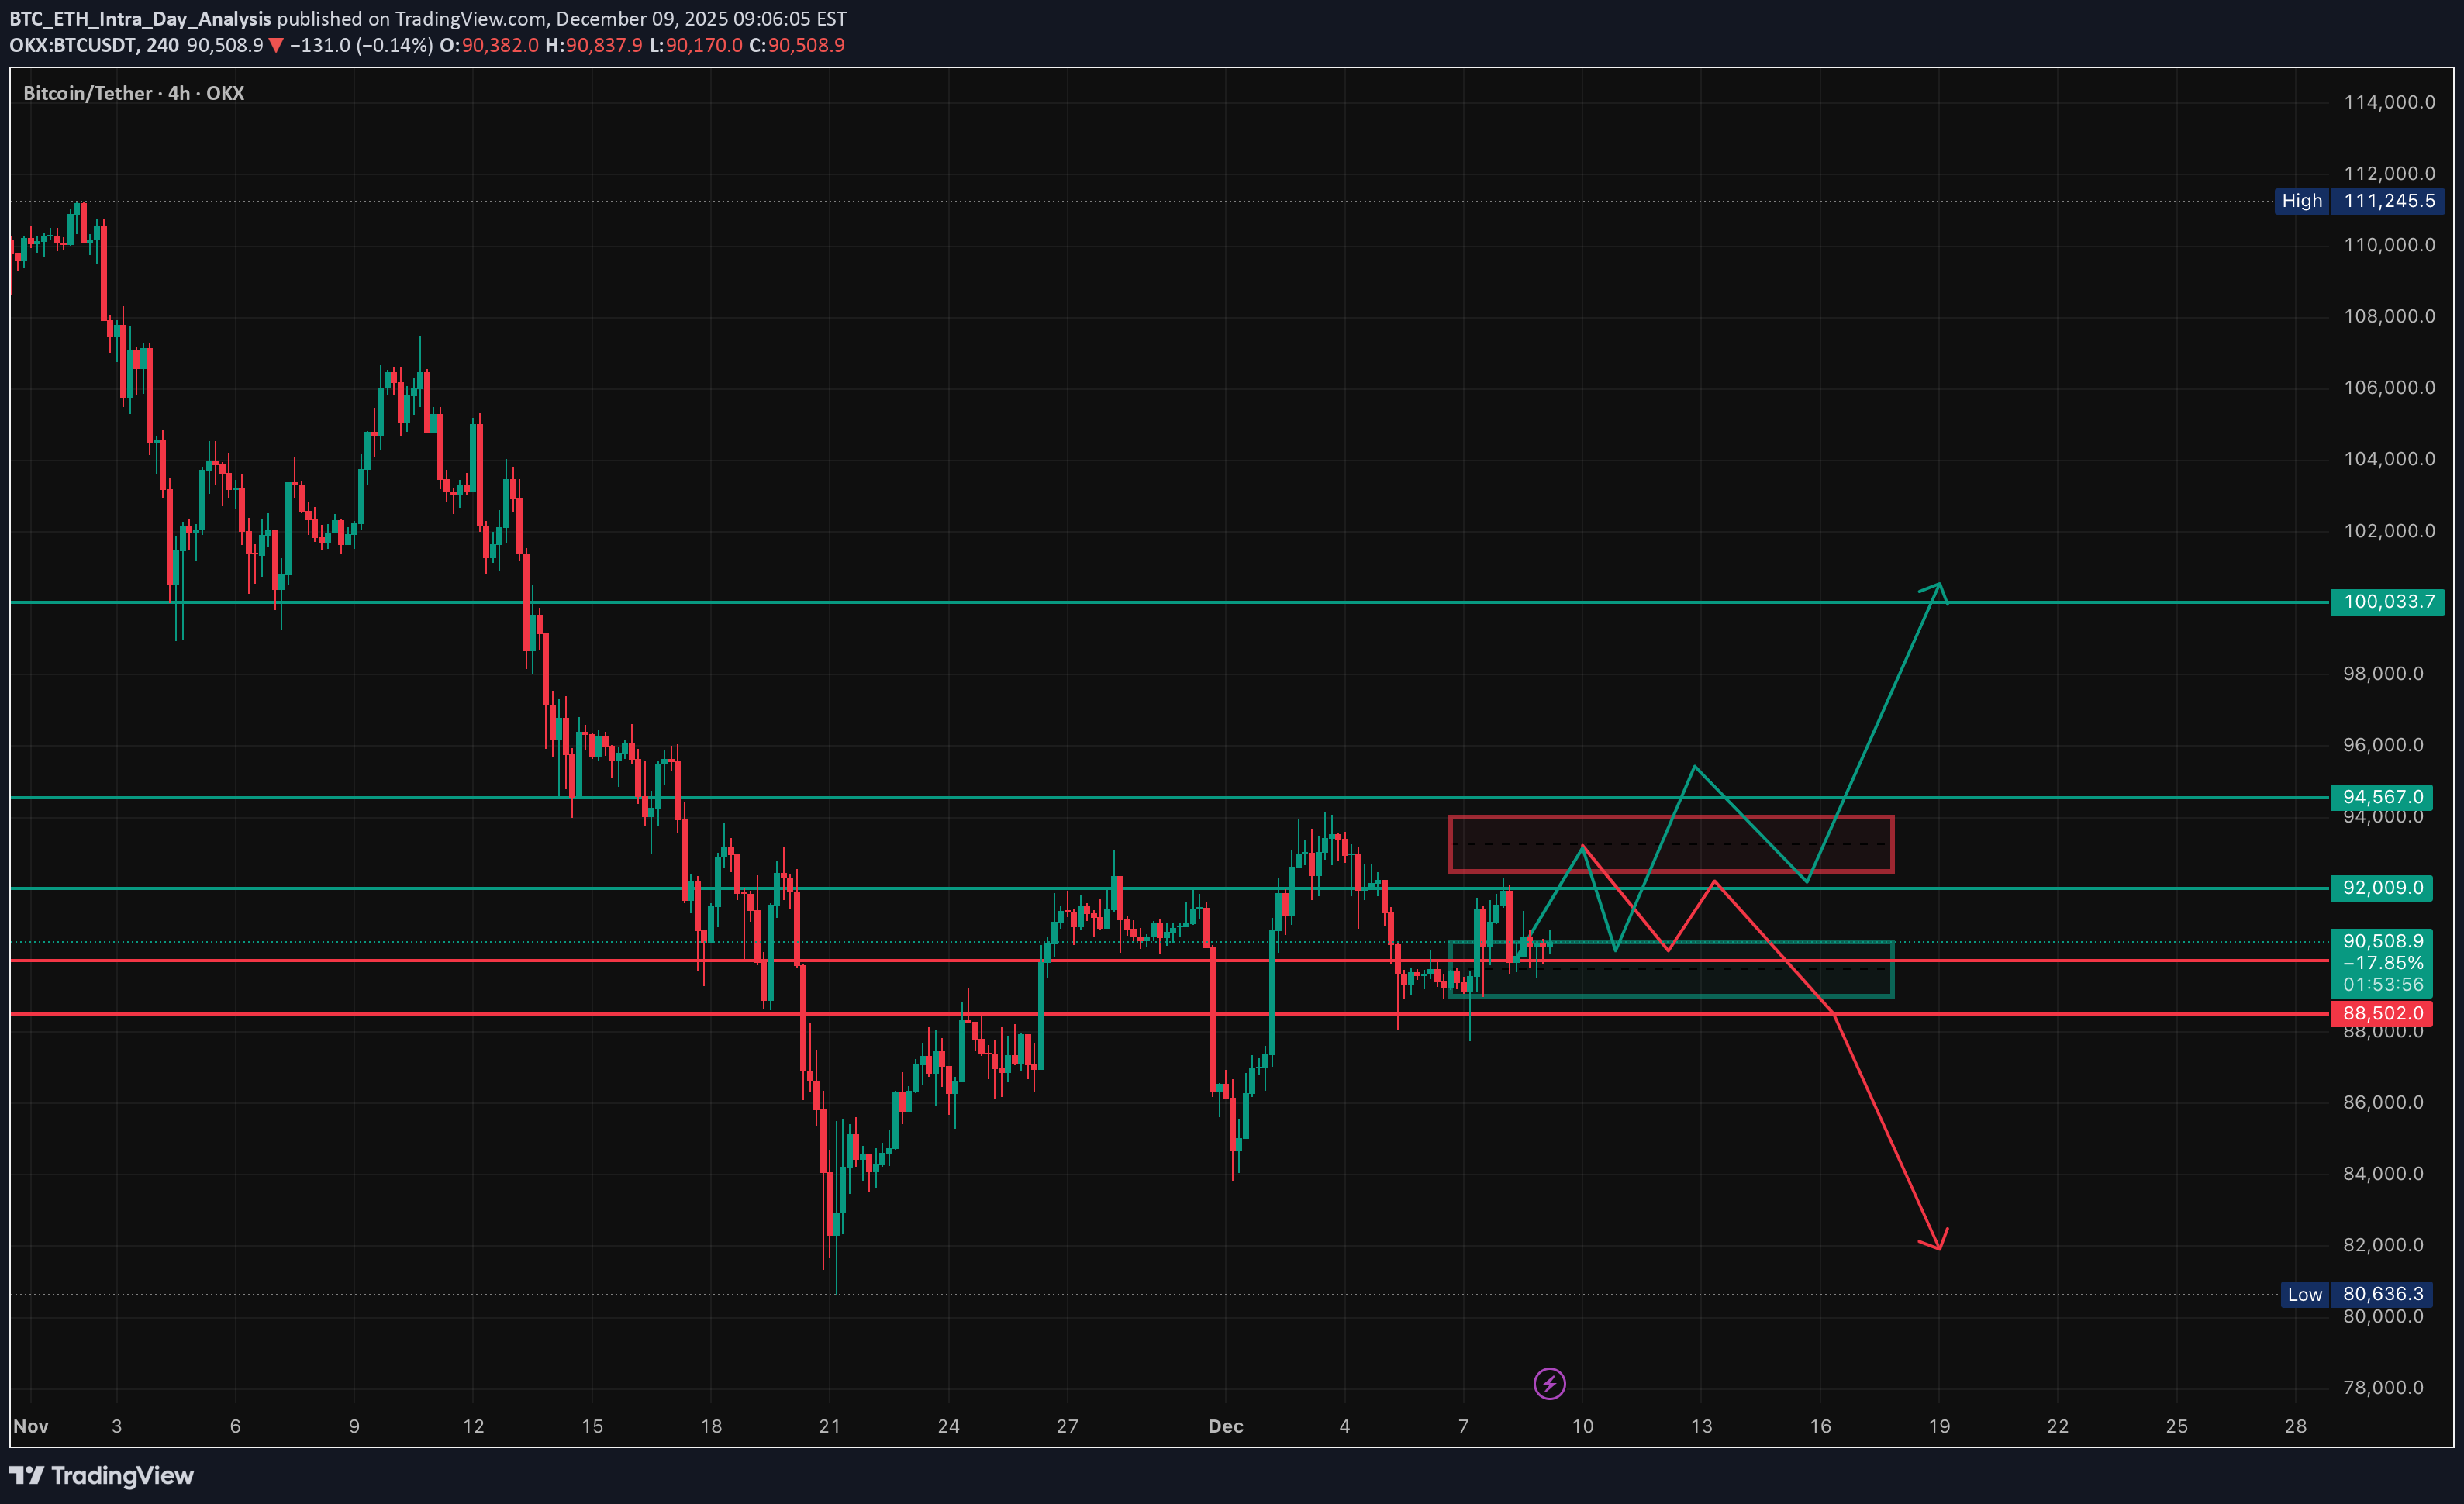
BTC Trade Plan (December 08, 2025) (D1 Bearish / H4 Sell Rallies → Compression / H1 Neutral / M15 Chop) ⬛️ 1. Higher Timeframe Context (D1 and H4) • D1 bias: bearish (descending channel post-ATH) • D1 range (approx): 84,000 – 126,000 (current lower third) • Key D1 zones: • Supply: 100–105k (broken) • Demand: 88–90k channel low • H4 bias: sell rallies turning compression (ascending triangle forming) • H4 zones of interest: • H4 Sell Zone 1: [92,000 – 94,000] – recent rejection + supply cluster • H4 Buy Zone 1: [88,500 – 90,000] – weekend low + trendline Active setups counter-trend long on dip (whale accumulation support), trend-aligned short only on clear rejection. ⬛️ 2. Preferred Setups by Horizon 🔳 2.1 Swing Setup (D1/H4) Counter-trend long the channel low / whale accumulation zone. Time horizon: multi-day to weeks. 🔲 2.2 Intraday Setup (H1 focus) Buy dips to 89.5-90k or breakout above 92k. Time horizon: intraday to overnight. ▫️ 2.3 Scalp Setup (M15 focus) Scalp range 90-92k or absorption plays — higher risk in chop. ▪️ 2.4 Arbitrage/Pairs: BTC dominance rising → BTC outperforming alts short-term. 🟩 3.1 Long Setup (Trend-Aligned with On-Chain / Swing-Intraday) • Execution timeframe: H4/H1 • Trigger timeframe: M15 • Entry zone: [89,000 – 90,500] • Pattern tags: [liquidity_sweep_reclaim, absorption_at_level, delta_divergence_low, range_low_absorption] Trigger conditions: • Successful defense 88-90k zone + CVD higher low • H1/H4 BOS up on volume • Whale accumulation continuation 🟥 3.2 Short Setup (Counter-Trend / Scalp Only) • Execution timeframe: H1 • Trigger timeframe: M15 • Entry zone: [92,500 – 94,000] • Pattern tags: [range_high_rejection, vwap_rejection, double_sweep_high] Trigger conditions: • Clear rejection with delta divergence high • Failure to break 94k pre-FOMC 🔴 4. Stops (Invalidation Levels) Long setups: 87,500 (channel break = bear confirmation) Short setups: 94,500 (breakout = squeeze) 🟢 5. Targets Long (swing/intraday): • TP1: 92,000 (VWAP/H1) • TP2: 94,000-95,000 (supply test/H4) • TP3: 100,000+ (HVN/D1 optional) Short (scalp): • TP1: 90,000 • TP2: 88,500 ⬛️ 6. Position Sizing • Baseline trend-aligned long (on-chain supported): 1.0% • Counter-trend short: 0.4% • Adjustments: +20% (whale buying + clean lev + Fed tailwind) → Effective: longs 1.2% risk, shorts 0.3% max ⬛️ 7. Risk Flags • FOMC Wednesday → vol expansion risk • Thin liquidity mid-week • Residual weekend trauma → fake moves possible • Macro correlation re-assertion if equities dump ⬛️ 8. Flip Conditions Bull → bear flip: clean close below 88k with volume + funding negative Bear → bull flip: H4 close >94.5k + CVD reset + whale continuation ⬛️ 9. Alternative Scenario Reject hard at 92-94k → descending triangle breakdown → fast move to 84-87k LVN void (bear trap completion, high risk short only with tight stop). ⬛️ 10. Model Self-Critique • Assumptions: whale accumulation continues, Fed delivers dovish cut, no macro shock • Vulnerabilities: sudden risk-off equities dump, whale distribution resumption, FOMC hawkish surprise • Behavioural: do not chase breakouts pre-FOMC, do not average into losing shorts against whales ⬛️ 11. Uncertainty and Constraints Uncertainty: medium → require flow + pattern confirmation, no high lev, prefer size on confirmed absorption only.
ETHUSDT Trade Plan (December 8, 2025)

ETH Trade Plan (December 8, 2025) (D1 / H4 / H1 / M15) ⬛️ 1. Higher Timeframe Context (D1 and H4) • D1 bias: neutral (bullish reversal attempt) • D1 range (approx): $2,800 – $3,762 • Key D1 zones: • Supply: $3,350–$3,762 (previous breakdown + OB cluster) • Demand: $2,800–$3,050 • H4 bias: buy dips • H4 zones of interest: • H4 Sell Zone 1: [$3,250 – $3,350] – previous rejection cluster (decaying) • H4 Buy Zone 1: [$3,100 – $3,150] – OB + HVN + weekend absorption All active setups are trend-aligned with emerging H4/D1 bullish structure. ⬛️ 2. Preferred Setups by Horizon 🔳 2.1 Swing Setup (D1/H4) • Idea: Long dips into $3,100–$3,150 for retest $3,500+ (post-Fusaka accumulation). • Time horizon: multi-day. 🔲 2.2 Intraday Setup (H1 focus) • Idea: Long reclaim/break $3,150–$3,190 zone. • Time horizon: today / overnight. ▫️ 2.3 Scalp Setup (M15 focus) • Idea: Dip-buy $3,100–$3,110 with absorption or breakout >$3,140. • Time horizon: minutes–hours. ▪️ 2.4 Arbitrage/Pairs Concept • Long ETH/BTC ratio – defending key support, mean-reversion bias up. 🟩 3. Entry Zones and Triggers Main Long Setup (Trend-Aligned) • Execution timeframe: H1 • Trigger timeframe: M15/M5 • Entry zone: [$3,100 – $3,140] • Context: H4 demand + weekend sweep reclaim + institutional spot buying • Pattern tags: [liquidity_sweep_reclaim, ob_retest_continuation, absorption_at_level, liquidation_spike_reversal] Trigger conditions: • Price holds $3,100 bid cluster + M15 bullish structure (higher low + volume delta buy) • CVD positive or diverging bullish • ML-Predictive 15m upside prob ≥0.65 • No aggressive ask walls rebuilding 🔴 4. Stops (Invalidation Levels) Long setups: • Stop: $3,045 (below weekend low + H4 demand) • Logic: Structural failure, CHoCH down confirmed. 🟢 5. Targets Long: • TP1: $3,190 – local supply + FVG fill (H1/H4) • TP2: $3,350 – supply retest + LVN void (H4/D1) • TP3 (swing): $3,600+ – next HVN + extension (D1) ⬛️ 6. Position Sizing • Baseline risk trend-aligned: 1.0% • Adjustments: −0.2× (put skew + weekend tail) +0.1× (strong absorption + news) • Effective risk: 0.9% main long, max 0.4% aggressive scalps ⬛️ 7. Risk Flags • Persistent put skew → vol expansion downside risk • Weekend liquidity memory (potential gap lower Asia) • High OI + neutral funding → crowded long risk if macro flips • Death cross D1 still active (macro timeframe bearish pressure) ⬛️ 8. Flip Conditions Bull → bear flip: H4 close < $3,050 + CVD strongly negative + funding negative. ⬛️ 9. Alternative Scenario Fakeout above $3,190 → sharp rejection (spoofing + gamma) → trap longs → drop to $2,950–$3,000 (next demand + round number). Requires delta selling + macro risk-off trigger. ⬛️ 10. Model Self-Critique • Main assumptions: Fusaka narrative sustains buying, institutional accumulation continues, no macro shock. • Vulnerabilities: put skew buyers re-assert, whale distribution at supply, weekend gap lower, misread absorption. • Do NOT chase extended above $3,200 without volume. Do NOT hold through Asia low liquidity without tight stops. ⬛️ 11. Uncertainty and Constraints Uncertainty: medium Constraints: require M15 confirmation + positive delta, no entries above $3,200, reduce size into NY close if no volume.
برنامه معاملاتی اتریوم (ETH): تحلیل روزانه ۸ دسامبر ۲۰۲۵ با نقاط ورود و خروج
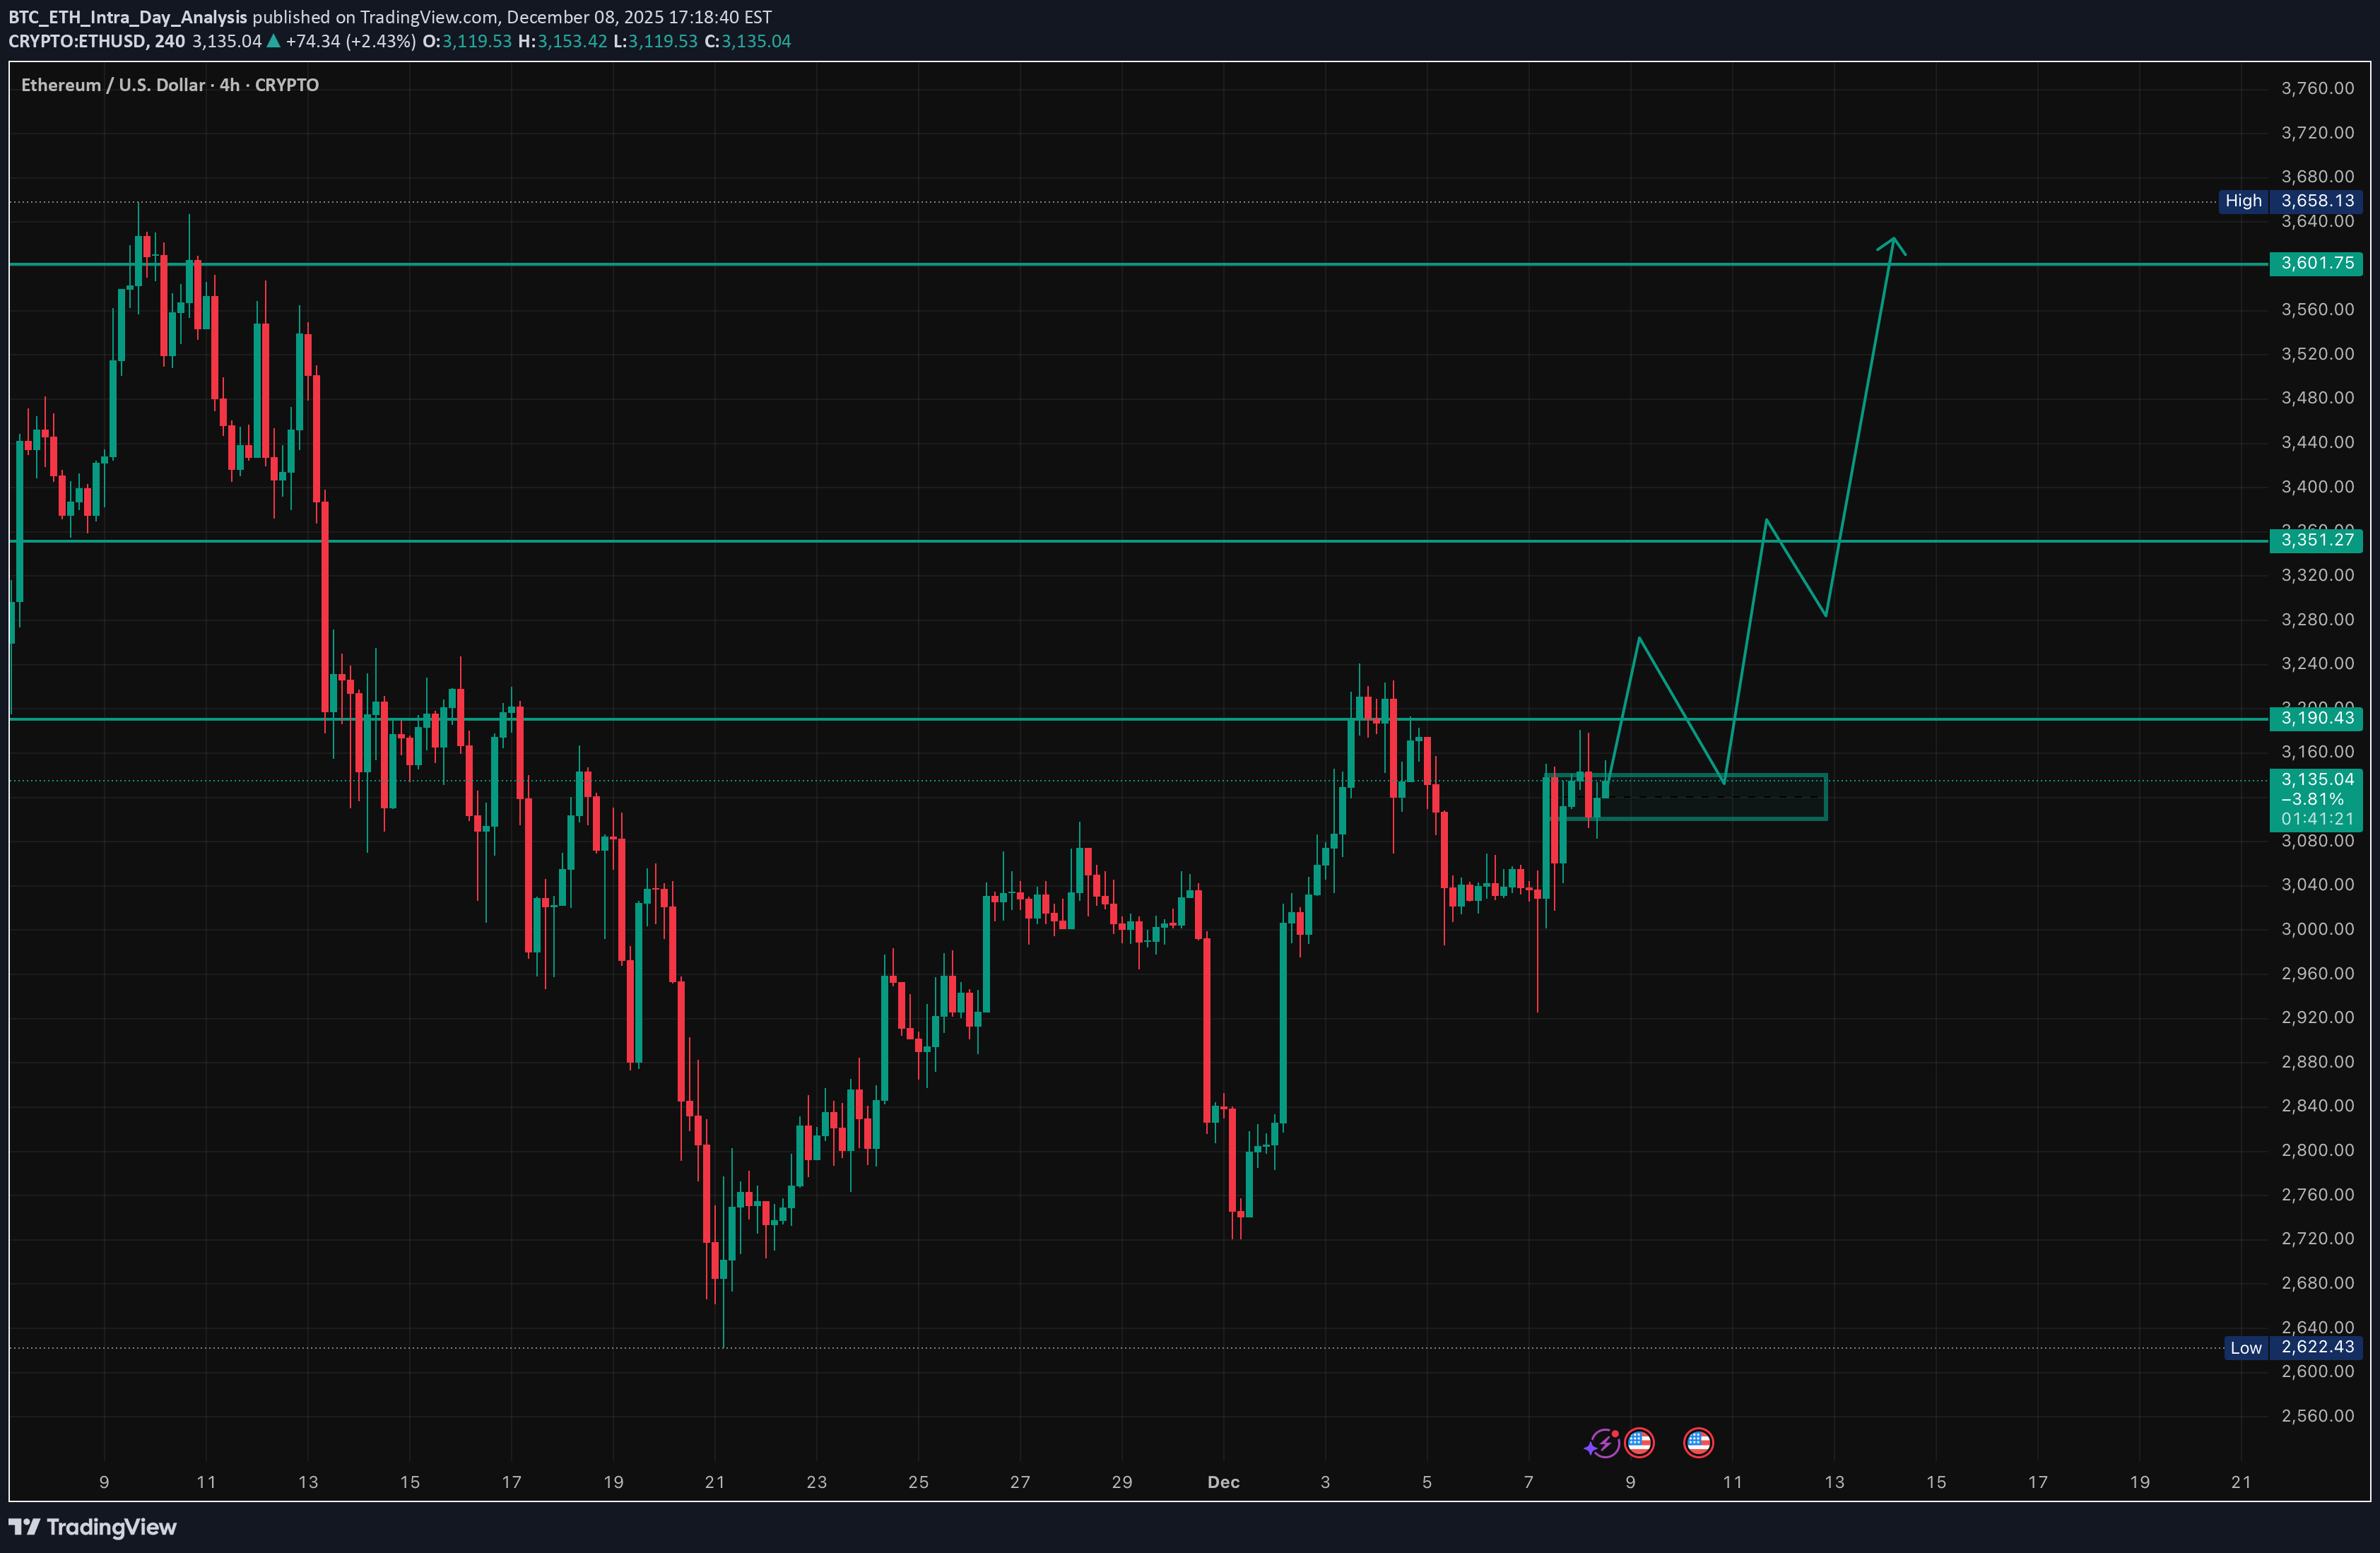
No financial advices / Just a trading diary 💸 Daily Intra-Day Reports powered by an institutional-grade pipeline (SMC + orderflow + derivatives + multi-timeframe confluence). Link: t.me/+qEniN092BHBkZGYy ETH Trade Plan (December 8, 2025) (D1 / H4 / H1 / M15) ⬛️ 1. Higher Timeframe Context (D1 and H4) • D1 bias: neutral (bullish reversal attempt) • D1 range (approx): $2,800 – $3,762 • Key D1 zones: • Supply: $3,350–$3,762 (previous breakdown + OB cluster) • Demand: $2,800–$3,050 • H4 bias: buy dips • H4 zones of interest: • H4 Sell Zone 1: [$3,250 – $3,350] – previous rejection cluster (decaying) • H4 Buy Zone 1: [$3,100 – $3,150] – OB + HVN + weekend absorption All active setups are trend-aligned with emerging H4/D1 bullish structure. ⬛️ 2. Preferred Setups by Horizon 🔳 2.1 Swing Setup (D1/H4) • Idea: Long dips into $3,100–$3,150 for retest $3,500+ (post-Fusaka accumulation). • Time horizon: multi-day. 🔲 2.2 Intraday Setup (H1 focus) • Idea: Long reclaim/break $3,150–$3,190 zone. • Time horizon: today / overnight. ▫️ 2.3 Scalp Setup (M15 focus) • Idea: Dip-buy $3,100–$3,110 with absorption or breakout >$3,140. • Time horizon: minutes–hours. ▪️ 2.4 Arbitrage/Pairs Concept • Long ETH/BTC ratio – defending key support, mean-reversion bias up. 🟩 3. Entry Zones and Triggers Main Long Setup (Trend-Aligned) • Execution timeframe: H1 • Trigger timeframe: M15/M5 • Entry zone: [$3,100 – $3,140] • Context: H4 demand + weekend sweep reclaim + institutional spot buying • Pattern tags: [liquidity_sweep_reclaim, ob_retest_continuation, absorption_at_level, liquidation_spike_reversal] Trigger conditions: • Price holds $3,100 bid cluster + M15 bullish structure (higher low + volume delta buy) • CVD positive or diverging bullish • ML-Predictive 15m upside prob ≥0.65 • No aggressive ask walls rebuilding 🔴 4. Stops (Invalidation Levels) Long setups: • Stop: $3,045 (below weekend low + H4 demand) • Logic: Structural failure, CHoCH down confirmed. 🟢 5. Targets Long: • TP1: $3,190 – local supply + FVG fill (H1/H4) • TP2: $3,350 – supply retest + LVN void (H4/D1) • TP3 (swing): $3,600+ – next HVN + extension (D1) ⬛️ 6. Position Sizing • Baseline risk trend-aligned: 1.0% • Adjustments: −0.2× (put skew + weekend tail) +0.1× (strong absorption + news) • Effective risk: 0.9% main long, max 0.4% aggressive scalps ⬛️ 7. Risk Flags • Persistent put skew → vol expansion downside risk • Weekend liquidity memory (potential gap lower Asia) • High OI + neutral funding → crowded long risk if macro flips • Death cross D1 still active (macro timeframe bearish pressure) ⬛️ 8. Flip Conditions Bull → bear flip: H4 close < $3,050 + CVD strongly negative + funding negative. ⬛️ 9. Alternative Scenario Fakeout above $3,190 → sharp rejection (spoofing + gamma) → trap longs → drop to $2,950–$3,000 (next demand + round number). Requires delta selling + macro risk-off trigger. ⬛️ 10. Model Self-Critique • Main assumptions: Fusaka narrative sustains buying, institutional accumulation continues, no macro shock. • Vulnerabilities: put skew buyers re-assert, whale distribution at supply, weekend gap lower, misread absorption. • Do NOT chase extended above $3,200 without volume. Do NOT hold through Asia low liquidity without tight stops. ⬛️ 11. Uncertainty and Constraints Uncertainty: medium Constraints: require M15 confirmation + positive delta, no entries above $3,200, reduce size into NY close if no volume.
BTC Trade Plan (December 08, 2025)
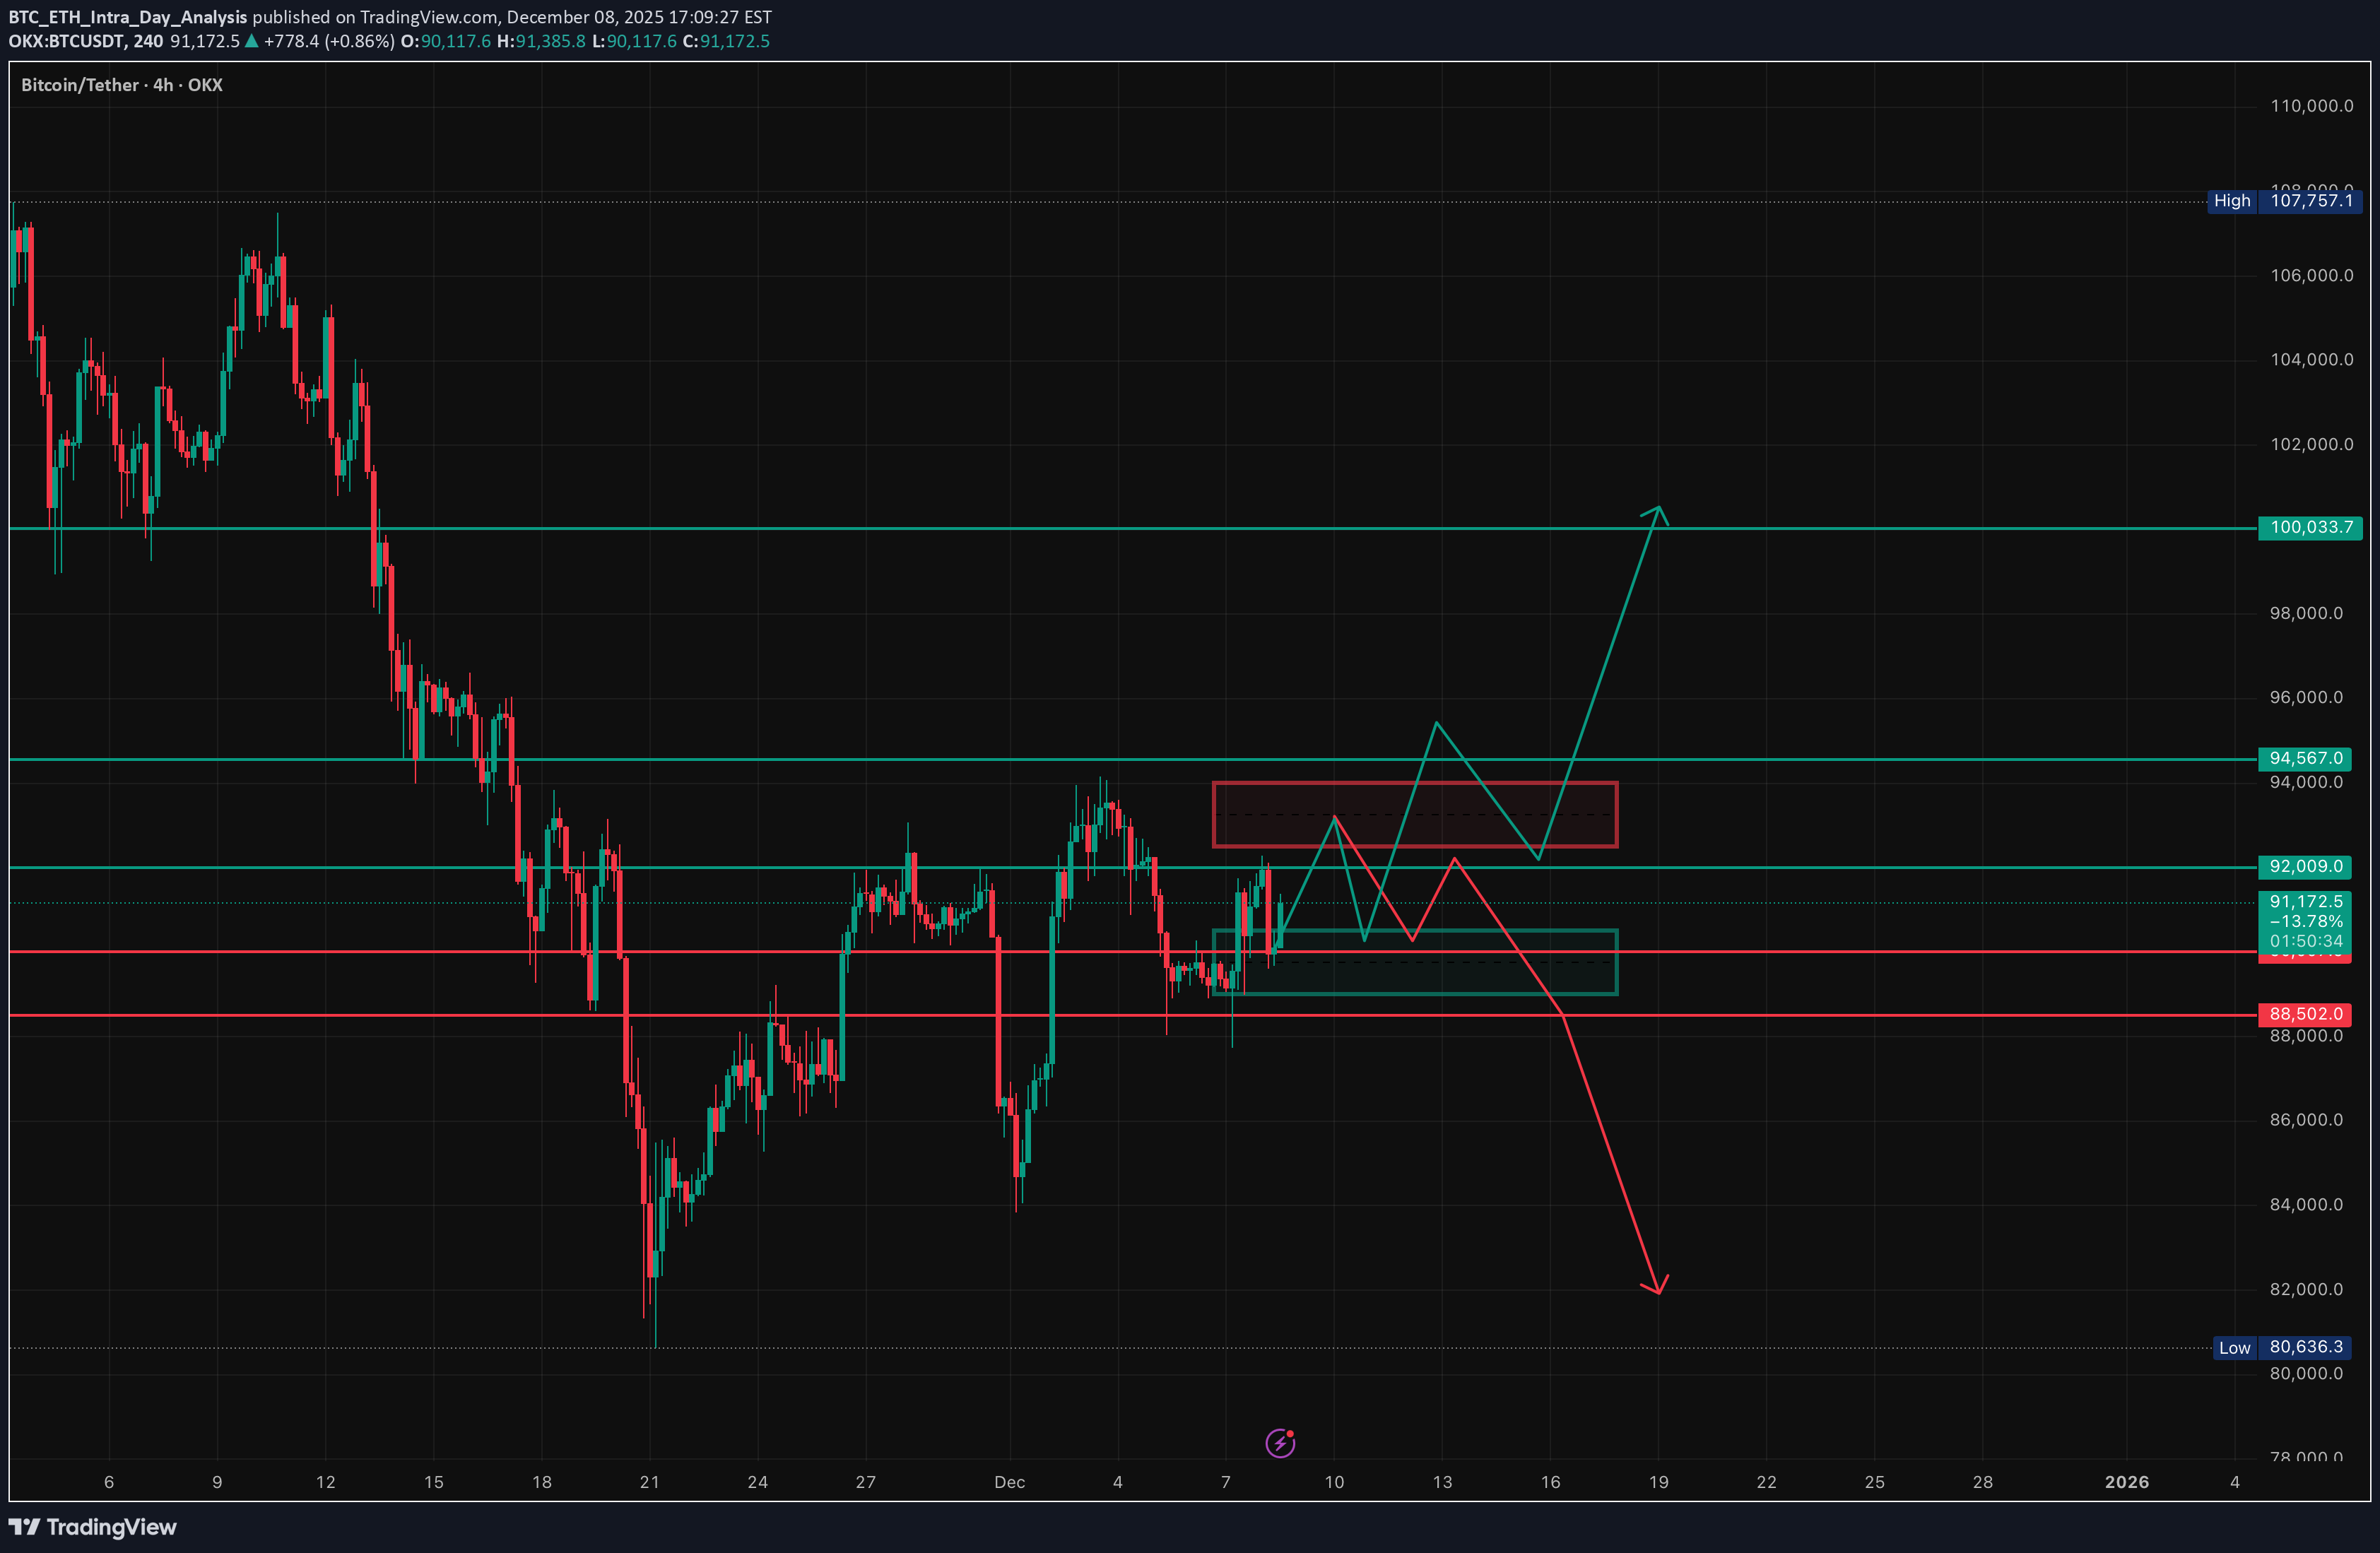
No financial advices / Just a trading diary 💸 Daily Intra-Day Reports powered by an institutional-grade pipeline (SMC + orderflow + derivatives + multi-timeframe confluence). Link: t.me/+qEniN092BHBkZGYy BTC Trade Plan (December 08, 2025) (D1 Bearish / H4 Sell Rallies → Compression / H1 Neutral / M15 Chop) ⬛️ 1. Higher Timeframe Context (D1 and H4) • D1 bias: bearish (descending channel post-ATH) • D1 range (approx): 84,000 – 126,000 (current lower third) • Key D1 zones: • Supply: 100–105k (broken) • Demand: 88–90k channel low • H4 bias: sell rallies turning compression (ascending triangle forming) • H4 zones of interest: • H4 Sell Zone 1: [92,000 – 94,000] – recent rejection + supply cluster • H4 Buy Zone 1: [88,500 – 90,000] – weekend low + trendline Active setups counter-trend long on dip (whale accumulation support), trend-aligned short only on clear rejection. ⬛️ 2. Preferred Setups by Horizon 🔳 2.1 Swing Setup (D1/H4) Counter-trend long the channel low / whale accumulation zone. Time horizon: multi-day to weeks. 🔲 2.2 Intraday Setup (H1 focus) Buy dips to 89.5-90k or breakout above 92k. Time horizon: intraday to overnight. ▫️ 2.3 Scalp Setup (M15 focus) Scalp range 90-92k or absorption plays — higher risk in chop. ▪️ 2.4 Arbitrage/Pairs: BTC dominance rising → BTC outperforming alts short-term. 🟩 3.1 Long Setup (Trend-Aligned with On-Chain / Swing-Intraday) • Execution timeframe: H4/H1 • Trigger timeframe: M15 • Entry zone: [89,000 – 90,500] • Pattern tags: [liquidity_sweep_reclaim, absorption_at_level, delta_divergence_low, range_low_absorption] Trigger conditions: • Successful defense 88-90k zone + CVD higher low • H1/H4 BOS up on volume • Whale accumulation continuation 🟥 3.2 Short Setup (Counter-Trend / Scalp Only) • Execution timeframe: H1 • Trigger timeframe: M15 • Entry zone: [92,500 – 94,000] • Pattern tags: [range_high_rejection, vwap_rejection, double_sweep_high] Trigger conditions: • Clear rejection with delta divergence high • Failure to break 94k pre-FOMC 🔴 4. Stops (Invalidation Levels) Long setups: 87,500 (channel break = bear confirmation) Short setups: 94,500 (breakout = squeeze) 🟢 5. Targets Long (swing/intraday): • TP1: 92,000 (VWAP/H1) • TP2: 94,000-95,000 (supply test/H4) • TP3: 100,000+ (HVN/D1 optional) Short (scalp): • TP1: 90,000 • TP2: 88,500 ⬛️ 6. Position Sizing • Baseline trend-aligned long (on-chain supported): 1.0% • Counter-trend short: 0.4% • Adjustments: +20% (whale buying + clean lev + Fed tailwind) → Effective: longs 1.2% risk, shorts 0.3% max ⬛️ 7. Risk Flags • FOMC Wednesday → vol expansion risk • Thin liquidity mid-week • Residual weekend trauma → fake moves possible • Macro correlation re-assertion if equities dump ⬛️ 8. Flip Conditions Bull → bear flip: clean close below 88k with volume + funding negative Bear → bull flip: H4 close >94.5k + CVD reset + whale continuation ⬛️ 9. Alternative Scenario Reject hard at 92-94k → descending triangle breakdown → fast move to 84-87k LVN void (bear trap completion, high risk short only with tight stop). ⬛️ 10. Model Self-Critique • Assumptions: whale accumulation continues, Fed delivers dovish cut, no macro shock • Vulnerabilities: sudden risk-off equities dump, whale distribution resumption, FOMC hawkish surprise • Behavioural: do not chase breakouts pre-FOMC, do not average into losing shorts against whales ⬛️ 11. Uncertainty and Constraints Uncertainty: medium → require flow + pattern confirmation, no high lev, prefer size on confirmed absorption only.
Disclaimer
Any content and materials included in Sahmeto's website and official communication channels are a compilation of personal opinions and analyses and are not binding. They do not constitute any recommendation for buying, selling, entering or exiting the stock market and cryptocurrency market. Also, all news and analyses included in the website and channels are merely republished information from official and unofficial domestic and foreign sources, and it is obvious that users of the said content are responsible for following up and ensuring the authenticity and accuracy of the materials. Therefore, while disclaiming responsibility, it is declared that the responsibility for any decision-making, action, and potential profit and loss in the capital market and cryptocurrency market lies with the trader.