Technical analysis by FalconLineTrading about Symbol TAO on 11/27/2025

FalconLineTrading
تحلیل تخصصی TAO: استراتژی خرید و فروش پیش از هاوینگ دسامبر ۲۰۲۵
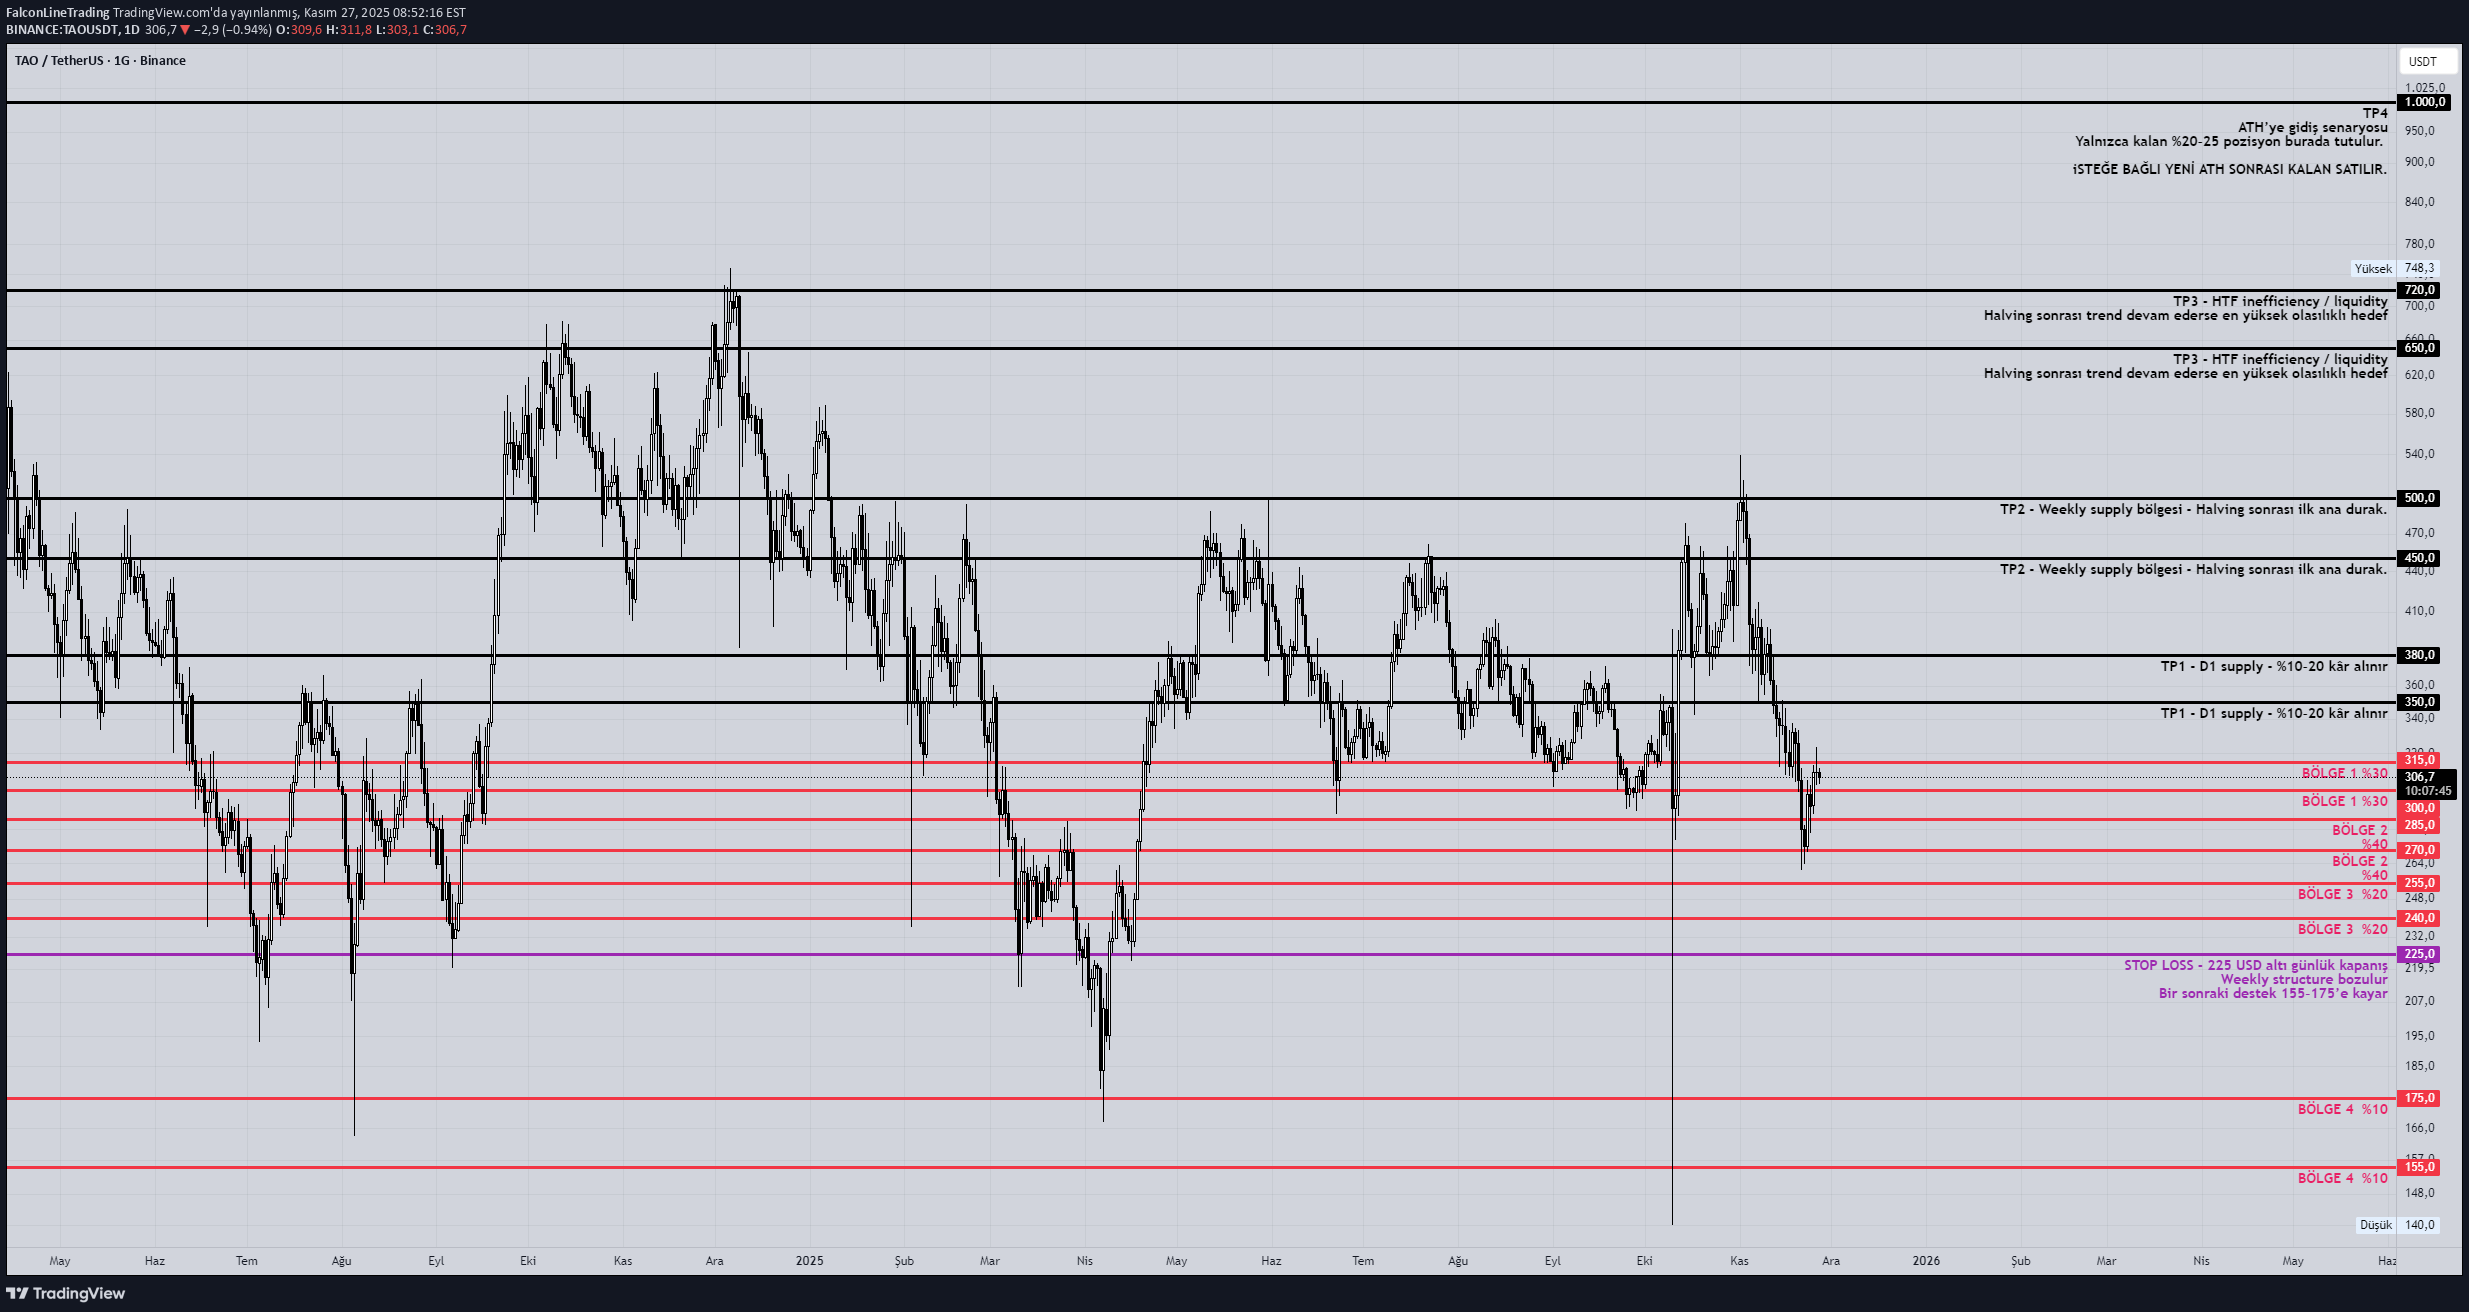
Bittensor (TAO) — December 10, 2025 Halving Confidence: 92% Impact Analysis •Halving = production decreases → supply shock → very strong bullish catalyst if combined with AI hype. •TAO It is already a hype-driven coin, if it works after the halving, it may even go parabolic. Market Impact •Pre-event reaction: strong pump •After: Similar to BTC halving pattern → horizontal for 5–10 days → continuing trend possible. Risk Hype If it overheats, it may “buy the rumor, sell the news”. ________________________________________ 1) TAO – Monthly (1M) Macro Analysis What I see from the chart: TAO It is still a very young asset and the macro trend cannot be read properly. However, there is an all-time wick of 1557 USD extreme liquidity point. Currently, the price is stuck in the 300–330 USD band. Structure of the last 4–5 months: large wicks (liquidity hunt) HL–LL mixed “expanding range” 1M Result: TAO has a “trendless but explosive” macro structure. Halving → may break this structure upwards with a long-term supply shock. 2) TAO – Weekly (1W) Critical areas on the weekly chart: 410–450 USD → weekly major supply 260–280 USD → weekly demand 215–230 USD → weekly liquidity flush zone 155 USD → max capitulation level Price currently: 300–330 USD → full weekly midrange. 1W Result: It has an incredibly clean "pre-halving accumulation range" structure. This is similar to BTC's 2019–2020 pre-halving range. 3) TAO – Daily (1D) Clear zones in the log: 350–380: daily supply 300–315: daily flip zone 270–280: D1 demand 240–255: clean imbalance + sweep region 155: extreme capitulation wick 1D Result: Even though the daily structure shows a downward bias, every bottom can be taken aggressively as the halving approaches. 4) TAO – 4H Operational The 4H chart gives us timing: It cannot stay above 320–330 → this is the “short-term rejection zone” 295–305 → micro support 270–280 → ideal swing long zone 240–250 → liquidation trap zone 155 → abnormal wick 4H Result: The purpose of the first arm is to verify that the price is still range-bound. Now the main part: TAO HALVING (December 10, 2025) Spot Strategy Event strength for TAO is too high (9.5/10). That's why I combine the strategy with the “BTC pre-post halving pattern”: First the bottom, then the event pump Short consolidation continues after the event This pattern seems to fit perfectly in TAO. 1) Spot Purchase Regions I divide the budget by assuming 100: District 1 — Conservative Entry (Start) 300 – 315 USD 30% D1 flip zone The first starting point of the breakout before halving Zone 2 — Primary Accumulation Zone 270 – 285 USD 40% 1W demand 4H OB compliance The healthiest login area for TAO Zone 3 — Deep Buy / Liquidity Sweep Zone 240 – 255 USD 20% → Perfect level for big players to clear stops and hit higher before the halving Zone 4 — Tail Risk Opportunity (In Case of Excessive Dump) 155 – 175 USD 10% → Rare events → A similar needle may repeat itself as the halving approaches Projected Ascension Phases for TAO (TP Plan) TP1 — 350–380 USD D1 supply 10–20% profit taken TP2 — 450–500 USD Weekly supply zone First main stop after halving TP3 — 650–720 USD HTF inefficiency / liquidity The highest probability target if the trend continues after halving TP4 — 1000+ USD Scenario of going to ATH Only the remaining 20–25% of the position is held here Stop-Loss (Risk Management for Spot) Hard SL is not required in spot, but structural invalidation is like this: Six-day close of 225 USD → Weekly structure is broken → Next support slides to 155–175 Event Time Management 10–20 Days Before: The bottom is collected 270–285 most critical region The period when Makers collect liquidity Event Week: 10–30% pump TP1 comes easy 1–4 Weeks After Event: consolidation TP2 and TP3 are targeted If the trend continues, 650+ will come TAO General Conclusion TAO's price structure gives a classic "explosive post-halving" setup with the combination of accumulation range + big event. Every dip is a buying opportunity, every uptick is a liquidity clearing.