Technical analysis by SupertradeOfficial about Symbol BTC: Buy recommendation (9/5/2025)

SupertradeOfficial
Bitcoin Breakout: $112.4K → $117.4K Target in Play
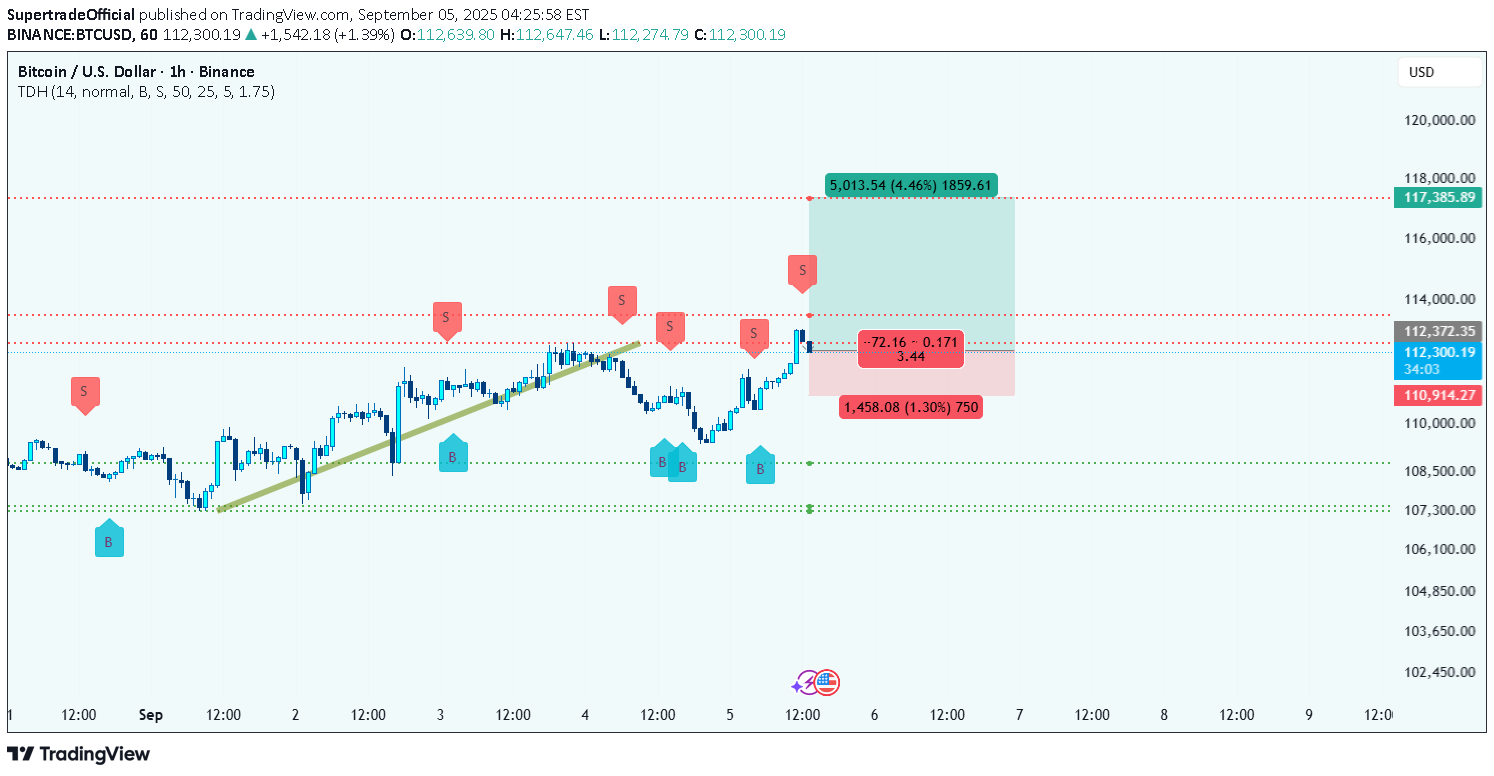
Market context & structure BTC has shown a steady climb into the current area: the market printed a sequence of higher lows through the first days of September and just produced a strong impulse leg into the 112k zone. That move carried price above a short-term trendline and absorbed nearby selling interest, which is bullish structure on the 1-hour timeframe. The recent pullback is shallow and looks like a classic retest of breakout area rather than a failure — buyers keep stepping in around the 107–109k region historically, which supports further upside attempts. Technical reasons to be bullish (justification) •Higher lows / higher highs pattern on the 1H — the structure favors continuation while this remains intact. •Break & retest behavior: price cleared the minor resistance area near 110–112k and is holding above that band after the retest. That suggests a higher-probability long opportunity rather than a fresh breakout-fail. •Clear targets and measured move: the chart’s long setup projects an upside objective near ~117,385, which aligns with a visible supply cluster and a logical liquidity magnet above current price. •Healthy R:R on the plan: the trade on the chart shows a relatively small stop compared with the upside objective, producing a favorable reward-to-risk. Key chart levels (visible on your image) •Entry area: ~112,350 – 112,400 (current price zone). •Stop (chart): 110,914 (invalidation below recent control). •Primary target (T1 / chart): 117,385 (main upside objective / supply cluster). •Lower support band to watch: ~107,300 – 108,800 (previous demand area; if price returns here buyers typically reappear). ________________________________________ Trade setup (clear, bullet format) •Entry: Long around 112,350 – 112,400. •Stop-loss: 110,914 (≈1,445 points below entry; ~1.3% risk). •Take Profit (T1): 117,385 (~5,026 points above entry; ~4.5% upside). •Risk : Reward: ≈ 3.5 : 1 (T1 vs SL). ________________________________________ Trade management & partial-profit rules •Partial profit booking (recommended): take 30–40% off the position once the trade is ~+2% to +2.5% in profit (roughly 114,500 – 115,000 on this setup). Locking a portion early secures gains and reduces emotional pressure. •After partials: move the stop on the remaining position to breakeven (entry) once the partial is taken — this converts the remaining position into a free trade. •Trailing: for the rest, trail the stop under each 1H higher low as price advances (or use a volatility-based trail, e.g., 1.5× ATR(14,1H)). This captures extended upside while protecting profits. •Second take profit: scale out another 30–40% near the charted target 117,385; leave a small runner if you want exposure to an extended move above that level. •If price falls to SL: accept the loss and re-evaluate structure — a clean hourly close below 110,914 invalidates the bullish plan. Risk and event notes •Keep position sizing so the trade risk stays within your rule (commonly 1–2% of account). •Be cautious around macro windows (FOMC, US data, high-impact crypto news) — these can cause slippage and sharp volatility on the 1H. Consider reducing size or tighter management near scheduled events. •Watch for false breakouts: if price stalls and fails to hold the breakout band for several hourly closes, avoid scaling in further. ________________________________________ Short summary The 1H structure favors a bullish continuation as long as price holds above the breakout/control band and 110,914. The charted plan offers a high R:R (~3.5:1) to ~117,385. Use staged profit-taking (30–40% at ~+2% — ~114.5k), move stop to breakeven, and trail the remainder under 1H higher lows to maximize capture while protecting gains. Would you like those same levels formatted as a one-line social caption and a short post-ready blurb you can drop under the chart?