Technical analysis by GoldFxMinds about Symbol PAXG on 9/14/2025

GoldFxMinds
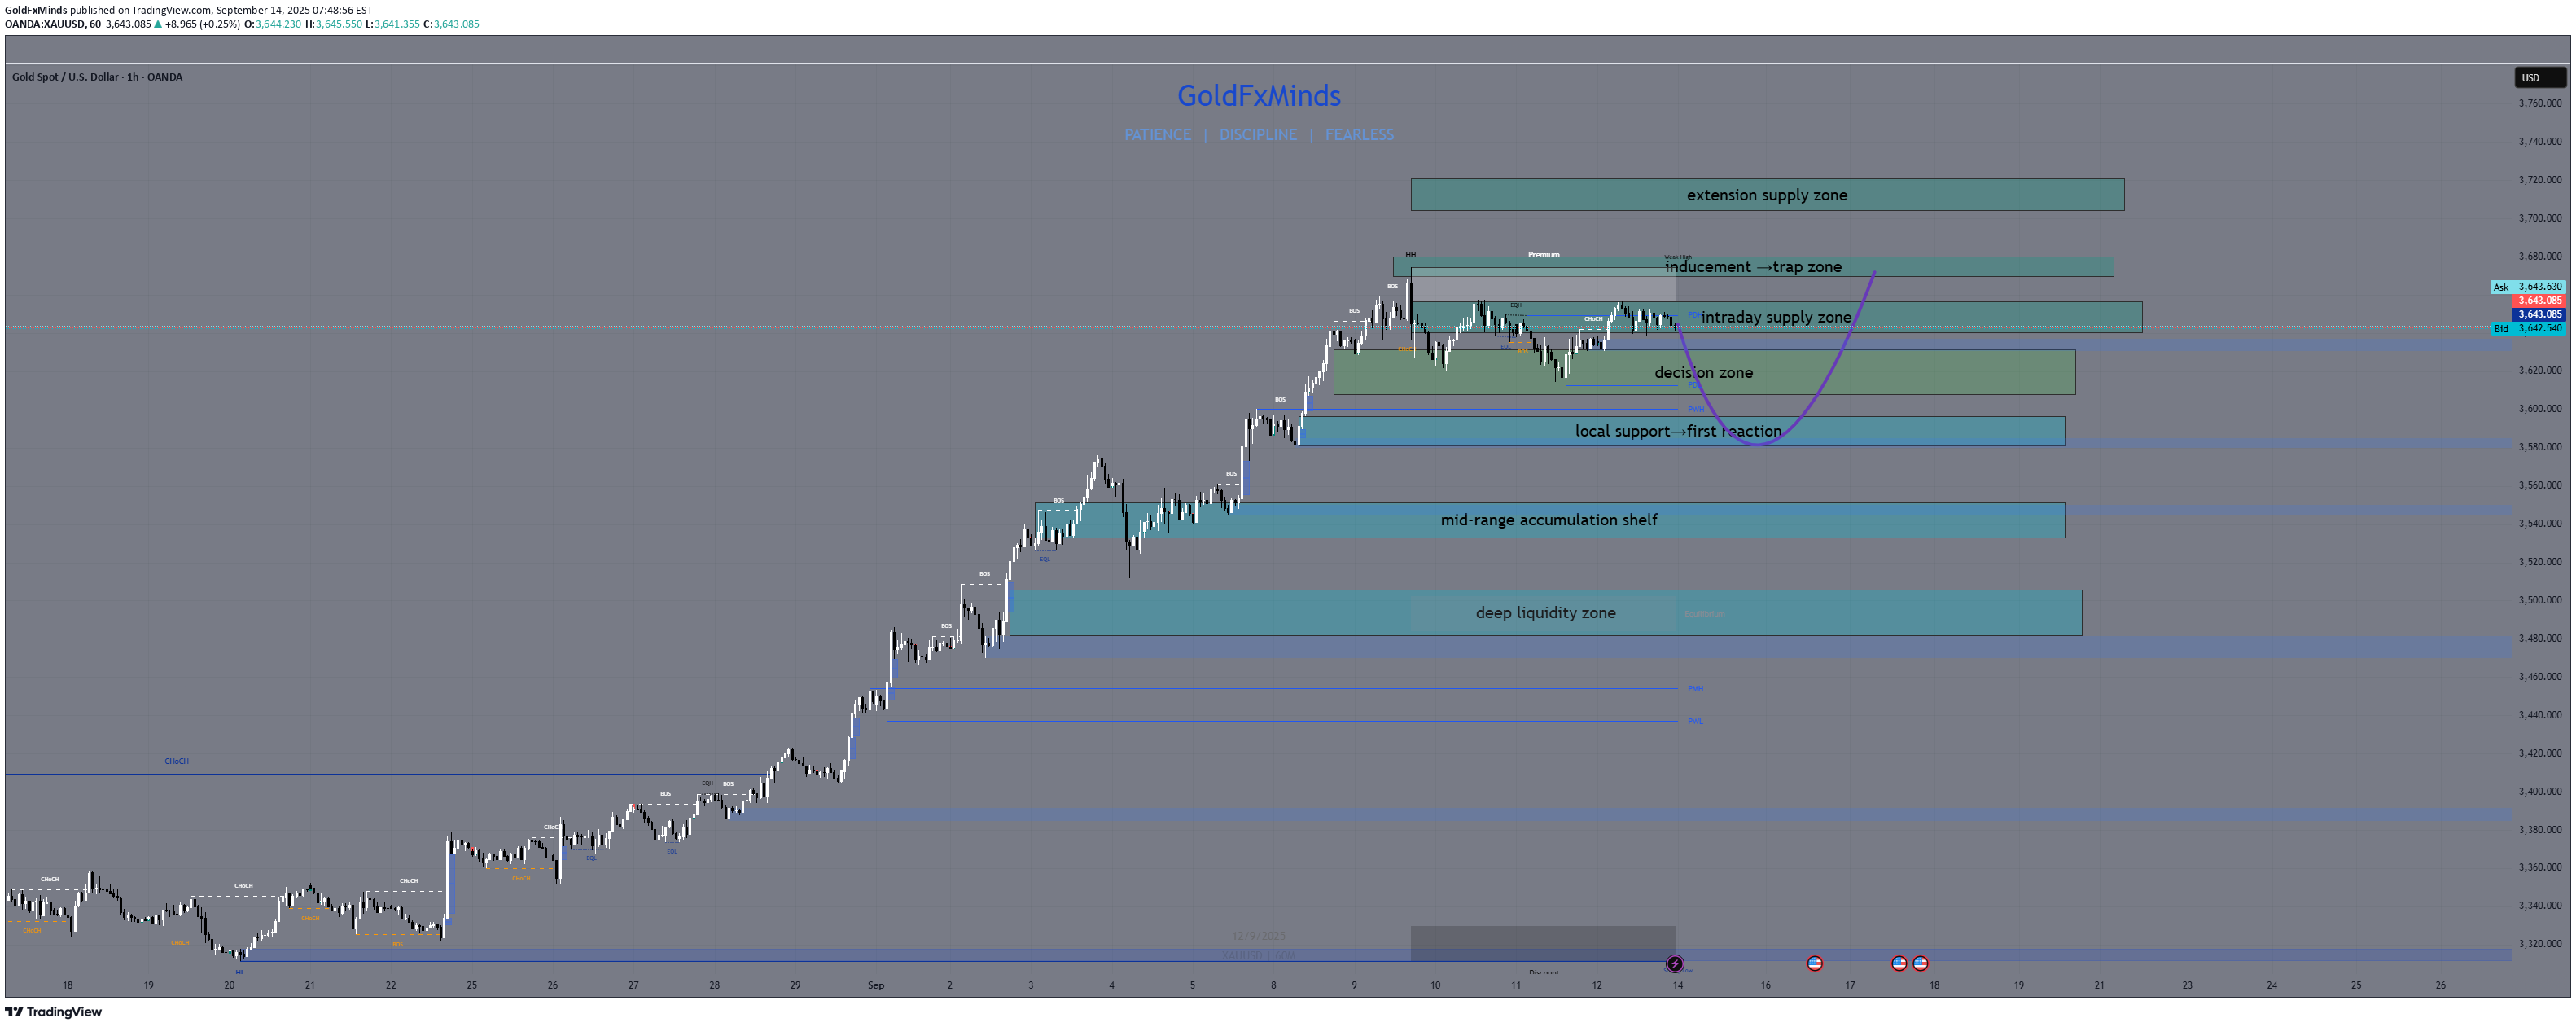
Gold doesn’t drift — it declares war at every zone. Be ready. 👋 Hello traders, This week, Gold is hovering just below its All-Time High — momentum is building, and structure is tightening. Price action is loading between high-pressure zones, waiting for a clean breakout or reversal. In this H1 outlook, we map out the tactical zones that matter: premium sell traps, mid-structure pivots, and the discount bases where liquidity reloads. Let’s map the warzone and get ready for surgical entries 👇 🔸 1. Market Structure & Technical Bias ✅ Bias: Still bullish, but extended EMAs 5/21/50: Bullish flow, slight slowdown RSI: Overbought on spikes → signaling pullback risk HTF: Still in a higher-high sequence unless 3535 breaks Structure: Building pressure between 3608–3654 🔸 2. Refined H1 Zones 🔺 Premium Sell Zones (Above Price) 3704–3720 → Expansion Exhaustion Zone • End-stage zone for stretched breakouts • Likely reversal if touched aggressively • Combines H1–H4 imbalance, extended PA 3670–3678 → ATH Trap Zone • Surrounds 3674 All-Time High • Likely inducement area with high-volume rejection risk • Key for fading euphoric breakouts 3640–3654 → Short-Term Liquidity Wall • Local OB + imbalance • Likely to provide quick rejection for tactical short scalps • First defense line for sellers 🔘 Decision Zone 3630–3608 → Momentum Pivot Zone • Central battlefield of the week • Above 3630 → bulls control • Below 3608 → opens first reentry zones • No raw entries here – only wait for reaction or BOS 🟦 Discount Buy Zones (Below Price) 3595–3580 → First Reaction Base • Minor OB + unfilled imbalance • May offer quick bounce or act as inducement trap 3550–3535 → Mid-Range Accumulation Shelf • Key structure base after bullish BOS • High-probability continuation buy area if respected • EMA + RSI alignment here favors recovery setups 3505–3490 → Deep Liquidity Reload Zone • Last clean demand before HTF bias risks reversal • Includes wick fill + imbalance • Strongest RR for high-quality buys 🎯 3. Battle Plan – Trade Scenarios 📈 Bullish Scenario: Ride the Continuation Hold above 3608 + bounce from 3580 → Watch for price to reclaim 3630, then attack 3654 → If 3674 breaks clean, next zone is 3704–3720 → Sniper buys valid on rejections from: 3595 (scalp) 3550 (continuation) 3505 (swing entry) Entry trigger: Bullish OB reaction + M15 BOS or bullish engulfing Invalidation: Loss of 3490 (HTF support failure) 📉 Bearish Scenario: Fade the Top Rejection from 3654 or 3678 → Confirm with M15/M30 shift → target 3608 → Loss of 3608 → unlocks 3580, 3550, and deeper Entry trigger: Strong bearish rejection from: 3654 (first tactical short) 3678 (ATH fade) 3720 (overextension trap) Invalidation: Clean break and hold above 3720 🧠 Final Thoughts This week is not about chasing — it’s about waiting for structure to invite you in. Every zone on this map is real, clean, and rooted in price logic. Watch for confirmation, avoid impulse trades, and stick to zones with meaning. Whether bulls extend the trend or sellers fade the rally, this H1 outlook is your sniper playbook. — 🔥 Was this helpful? 👉 Smash that LIKE, tap FOLLOW GoldFxMinds, and let’s turn levels into decisions — with zero guessing, only precision 🚀✨
