Technical analysis by Adlercon333 about Symbol PAXG on 1/6/2025
Adlercon333
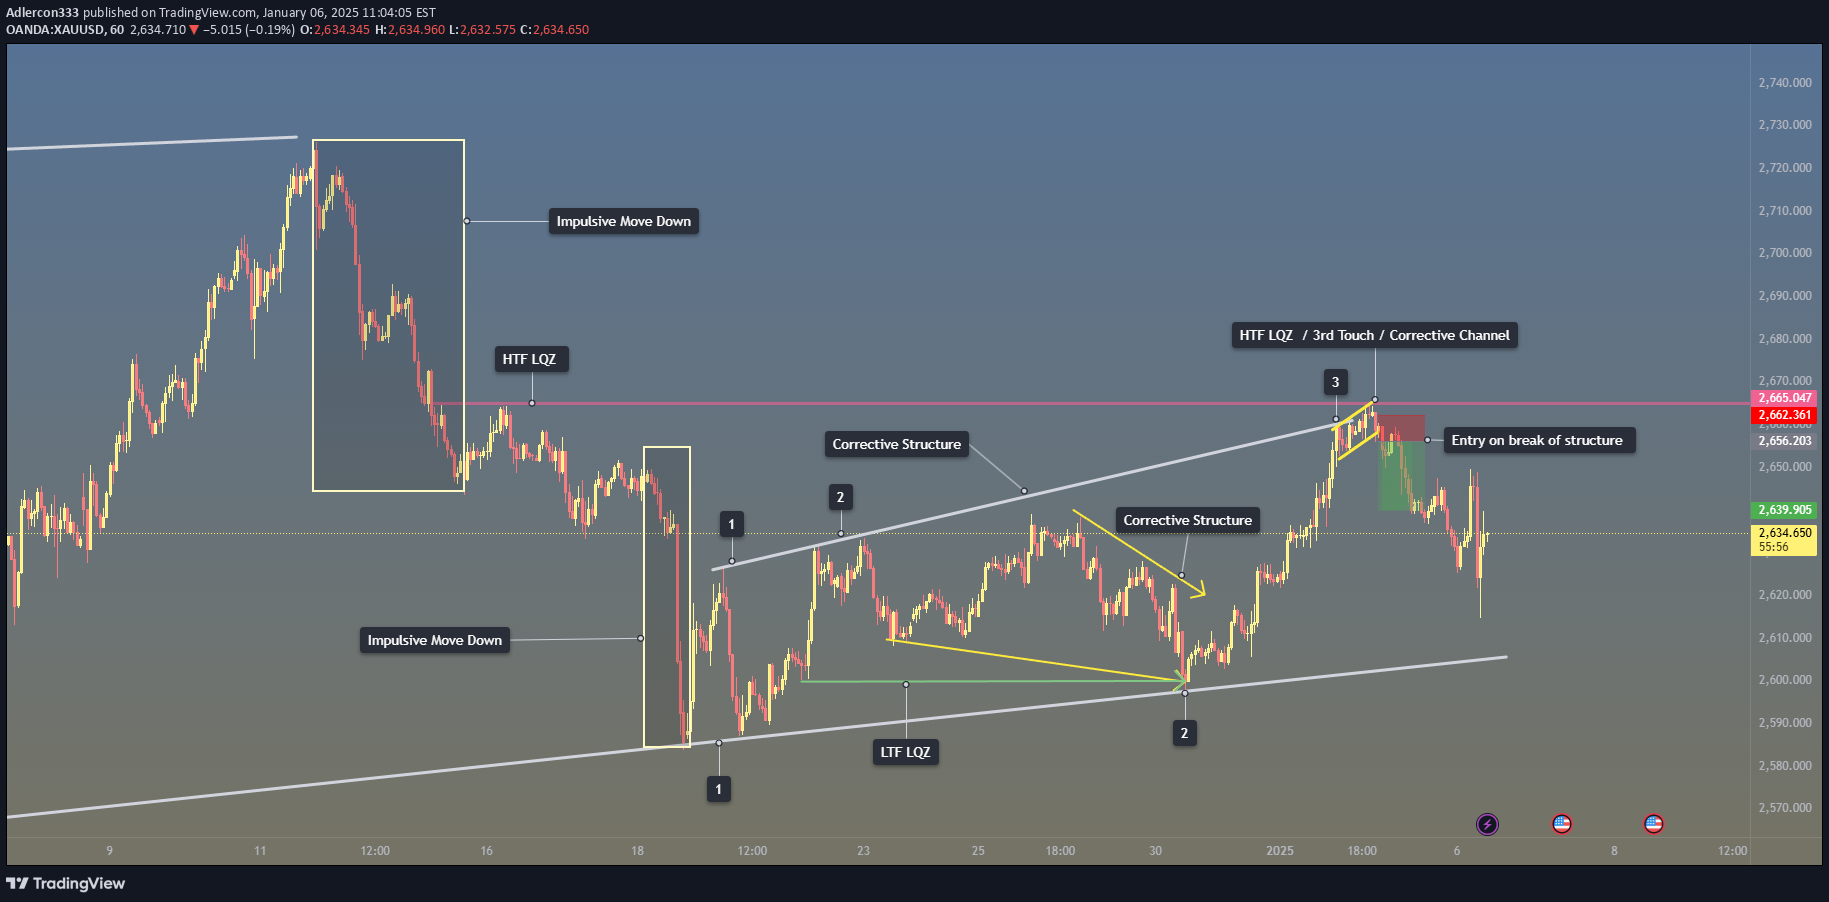
Reversal Setup Analysis: HTF Liquidity Zone + Ascending Channel Breakdown This chart highlights a high-probability bearish reversal setup based on key technical confluences. Here’s a step-by-step breakdown of the analysis: 1. High-Timeframe (HTF) Liquidity Zone (LQZ): - The red zone marks a major HTF supply area where price previously rejected with a strong impulsive move downward. This liquidity zone is critical as it represents an area where institutional players have shown activity, creating a high-probability region for a potential reversal. - As price approached this zone again, it did so in a corrective manner (via an ascending channel), which indicates weakening bullish momentum. 2. Impulsive vs. Corrective Structures: - Impulsive Move: The strong move away from the HTF LQZ (highlighted earlier in the chart) confirms bearish intent, serving as a key reference point for this trade idea. Corrective Structure: The price forms an ascending channel on the way back to retest the HTF LQZ, signaling exhaustion of buyers. - The third touch of the channel’s trendline coincides with the HTF LQZ, adding confluence for a potential bearish reversal. 3. Liquidity Zones in Play: - HTF Liquidity Zone (Supply): Serves as the key resistance level and primary rejection zone. - 15-Minute Liquidity Zone (Demand): Acts as a potential target for bearish momentum post-breakdown. - This multi-timeframe liquidity alignment strengthens the trade idea by providing clear areas of interest for entry, stop-loss, and take-profit placement. 4. Breakdown Entry and Structure: - Entry Trigger: The trade is triggered on the break of structure, where price falls through the lower boundary of the ascending channel. This breakdown confirms bearish momentum resuming after the corrective phase. - Stop-Loss Placement: Ideally placed above the HTF liquidity zone and beyond the third touch of the channel to account for potential fake-outs. - Take-Profit Levels: Targets can be set near the 15M liquidity zone or prior swing lows for a solid risk-to-reward ratio. 5. Key Takeaways: - This setup offers an excellent example of combining HTF liquidity zones, structural patterns, and market context to develop a high-probability trade idea. The rejection from the HTF LQZ aligns with the broader bearish narrative, while the ascending channel acts as a corrective structure leading to a continuation of the downward move. - By focusing on confluence factors like liquidity zones, impulsive vs. corrective moves, and structural breaks, this trade idea demonstrates a disciplined and strategic approach to trading reversals. Educational Insights: - Always zoom out to identify HTF zones of significance to ensure alignment with the larger market context. - Differentiate between impulsive and corrective structures to gauge the strength and intent of price movements. - Use pattern confluences (e.g., ascending channels) in combination with key zones to identify high-probability entries. - Prioritize patience and discipline by waiting for clear structural breaks to confirm your setup.
